总结了一下webwork开发的环境配置,转载请注明出处,以慰苦劳.
凡人凡居
在开发项目时,不管什么项目都需要一个好的开发环境,eclipse就是很好的了,当然很多牛人可能会有更多更好的办法,不过既然是主流,学好他也是我等小民的福气.
学习webwork时, 第一反应就是能不能集成到eclipse来,tomcate也继承进来,这样能调试就轻松了.也容易上手了. 恩,说干就干吧.
安装jdk1.5(现在好像有1.6了) 添加windows环境变量(我的电脑->属性->高级->环境变量)
添加JAVA_HOME: jdk路径
添加PATH值: 添加jdk/bin值
安装Tomcat5.5(好像有6.0了)
安装到需要填user/password画面时, password填入"fanren",其他默认
安装过程中查找系统中已安装的JRE,检查JRE安装路径是否正确
安装后启动Tomcat, http://localhost:8080查看经典画面
安装eclipse
http://www.eclipse.org/downloads/
我下载的for javaee的windows版本
解压即可,绿色产品.
启动eclipse
指定workspace
添加Ant View(Window->Show View->Ant)
eclipse环境设置Tomcat Server
Window > ShowView > Other > Server 选择Server>Servers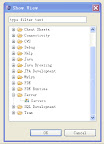
选择画面下方的Servers Tab, 单击鼠标右键, new->Server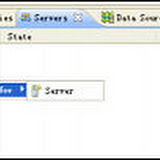
选择Tomcat 5.5 server
指定tomcate安装目录, 其他默认, ok, server tab出现Tomcat server了
右键启动
浏览http://localhost:8080, 有反应就成功了, 我这里出错提示,因为没项目嘛
新建NewLife项目 new> project> web> Dynamic Web Project
其他默认就可以了,finish
在src目录下添加子目录
conf (存放配置文件)
java (存放java源文件)
在web\WEB-INF新建子目录
classes (存放class文件和配置文件)
选择"NewLife"项目, 右键选择Properties
选择"Java Build Path", 单击Source tab, 单击Add Folder,展开NewLife>src文件夹
勾上src下的conf,java, 点击OK, 出现递归警告, remove掉src目录就好了
在"Default output folder:", 点击Browse, 选择WEB-INF\classes(新建的classes目录),
点击OK, classes目录会自动隐藏. 注意这里要选择 "java"视图, 默认是"java ee"视图, 右上角点击小窗口图标进行选择.
项目与Tomcat Server相连
选择下方的Servers Tab,右键选择 "Add and Remove Projects"
点击NewLife , 点击add>, 项目出现先右侧, OK
导入webwork lib库
参考http://wiki.javascud.org/display/ww2cndoc/Getting+Started
选择web/WEB-INF/lib,右键选择import>Gerneral>FileSystem,
选择"webwork-2.2.5\lib\default",确定->全选->Finish,
在"Web App Libraries"下可以看见导入的jar包
按照同样方法导入webwork-2.2.5.jar, lib/spring下的所有jar包,为什么使用spring,wiki上有说明
编写配置文件, copy吧
web.xml
<?xml version="1.0" encoding="UTF-8"?>
<web-app id="WebApp_ID" version="2.4"
  xmlns="http://java.sun.com/xml/ns/j2ee"
  xmlns:xsi="http://www.w3.org/2001/XMLSchema-instance"
  xsi:schemaLocation="http://java.sun.com/xml/ns/j2ee http://java.sun.com/xml/ns/j2ee/web-app_2_4.xsd">
  <display-name>NewLife</display-name>
  <welcome-file-list>
      <welcome-file>index.html</welcome-file>
      <welcome-file>index.htm</welcome-file>
      <welcome-file>index.jsp</welcome-file>
      <welcome-file>default.html</welcome-file>
      <welcome-file>default.htm</welcome-file>
      <welcome-file>default.jsp</welcome-file>
  </welcome-file-list>

  <filter>
      <filter-name>webwork</filter-name>
      <filter-class>
          com.opensymphony.webwork.dispatcher.FilterDispatcher
      </filter-class>
  </filter>

  <filter-mapping>
      <filter-name>webwork</filter-name>
      <url-pattern>/*</url-pattern>
  </filter-mapping>
  <!-- As of 2.2, Spring is the preferred IoC container rather than XWork,
      so you'll have to include the spring jars if you want to use
      Spring's IoC capabilities in WebWork. (Thanks Hani for commenting)
      If you want to use deprecated integrated IoC container instead, you may
      want to omit the following listener configuration.
  -->

  <!-- The following taglib directive would be needed if your servlet container would comply
      to Servlet Spec <= 2.2
      <taglib>
      <taglib-uri>/webwork</taglib-uri>
      <taglib-location>/WEB-INF/lib/webwork.jar</taglib-location>
      </taglib>
  -->
</web-app>
xwork.xml
<!DOCTYPE xwork PUBLIC "-//OpenSymphony Group//XWork 1.1.1//EN"
"http://www.opensymphony.com/xwork/xwork-1.1.1.dtd">

<xwork>
  <!-- Include webwork defaults (from WebWork JAR). -->
  <include file="webwork-default.xml" />

  <!-- Configuration for the default package. -->
  <package name="default" extends="webwork-default">
      <default-interceptor-ref name="completeStack"/>

      <action name="helloWorld" class="fanren.HelloWorld">
          <result name="success">WEB-INF/jsp/hello.jsp</result>
      </action>
  </package>
</xwork>
Web/WEB-INF/jsp/hello.jsp
<%@ taglib prefix="ww" uri="/webwork" %>
<html>
 <head>
  <title>Hello Page</title>
 </head>
<body>
  The message generated by my first action is:
  <ww:property value="message"/>
</body>
</html>
重启tomcat, 访问http://localhost:8080/NewLife/helloWorld.action
出现
The message generated by my first action is: Hello, WebWorld! The time is: 2008-4-18
调试也可以了, 以debug模式启动tomcat, 记得先下好断点.
2008年4月18日
webwork开发-eclipse配置
订阅:
博文评论 (Atom)

没有评论:
发表评论